
EDIT: And then, as soon as my computer was replaced, I fractured a rib, and as dumb/lame/pathetic as that sounds, found it too painful to sit in a chair and type. For several weeks. So that was the end of Dungeon 23 for me. What a bummer.
 My computer died.while it's in the shop, I'm continuing to work on the Dungeon23 challenge, but won't be posting much as it's really a pain in the keyboard trying to post to blogger from my phone.
Room 1.4: This is a 70 foot long stone bridge connecting the north barbican gatehouse to the Northwest Gate of the Castle. The stone handrail is mostly intact, the surface is heavily scratched and mostly free of moss.

In reality, these are of course the petrified features of Yuan Ti who died upon the bridge earlier this year. Players will likely grok to this quickly, and the GM should make no effort to conceal it from them if they inquire along those lines. They'll probably draw the wrong conclusion anyway, assuming it to be foreshadowing of a Medusa much later in the module, rather than a basilisk showing up in the next couple of rooms.
Speaking of which: While most of the time this bridge is empty (other than stone cold snakemen statues), there are two fairly regular exceptions when the creatures from Room 1.XX show up. On cold days, the basilisk comes to sun itself on the bridge for an hour or two in the middle of the day to warm up. At sunset, it's owner takes it out for a 15-minute walk and a frequent snack, often plucking a tasty bat out of the air when the swarms release from 1.1A. At either time, both creatures from 1.XX arrive together.
Room 1.3: This is inside the base of the Northern Barbican Gatehouse. When the barbican was originally built, this base was a solid rock foundation, in-filled with stone debris and aggregate. It was still intact when the castle was defeated by sorcery and treachery, but in the years since, it has been consumed by the acidic roots of several semi-intelligent plant monsters. Their digestion has weakened the tower, causing the floors above to partially collapse, and leaving a hollow that has of late become a nest for a large colony of bats.
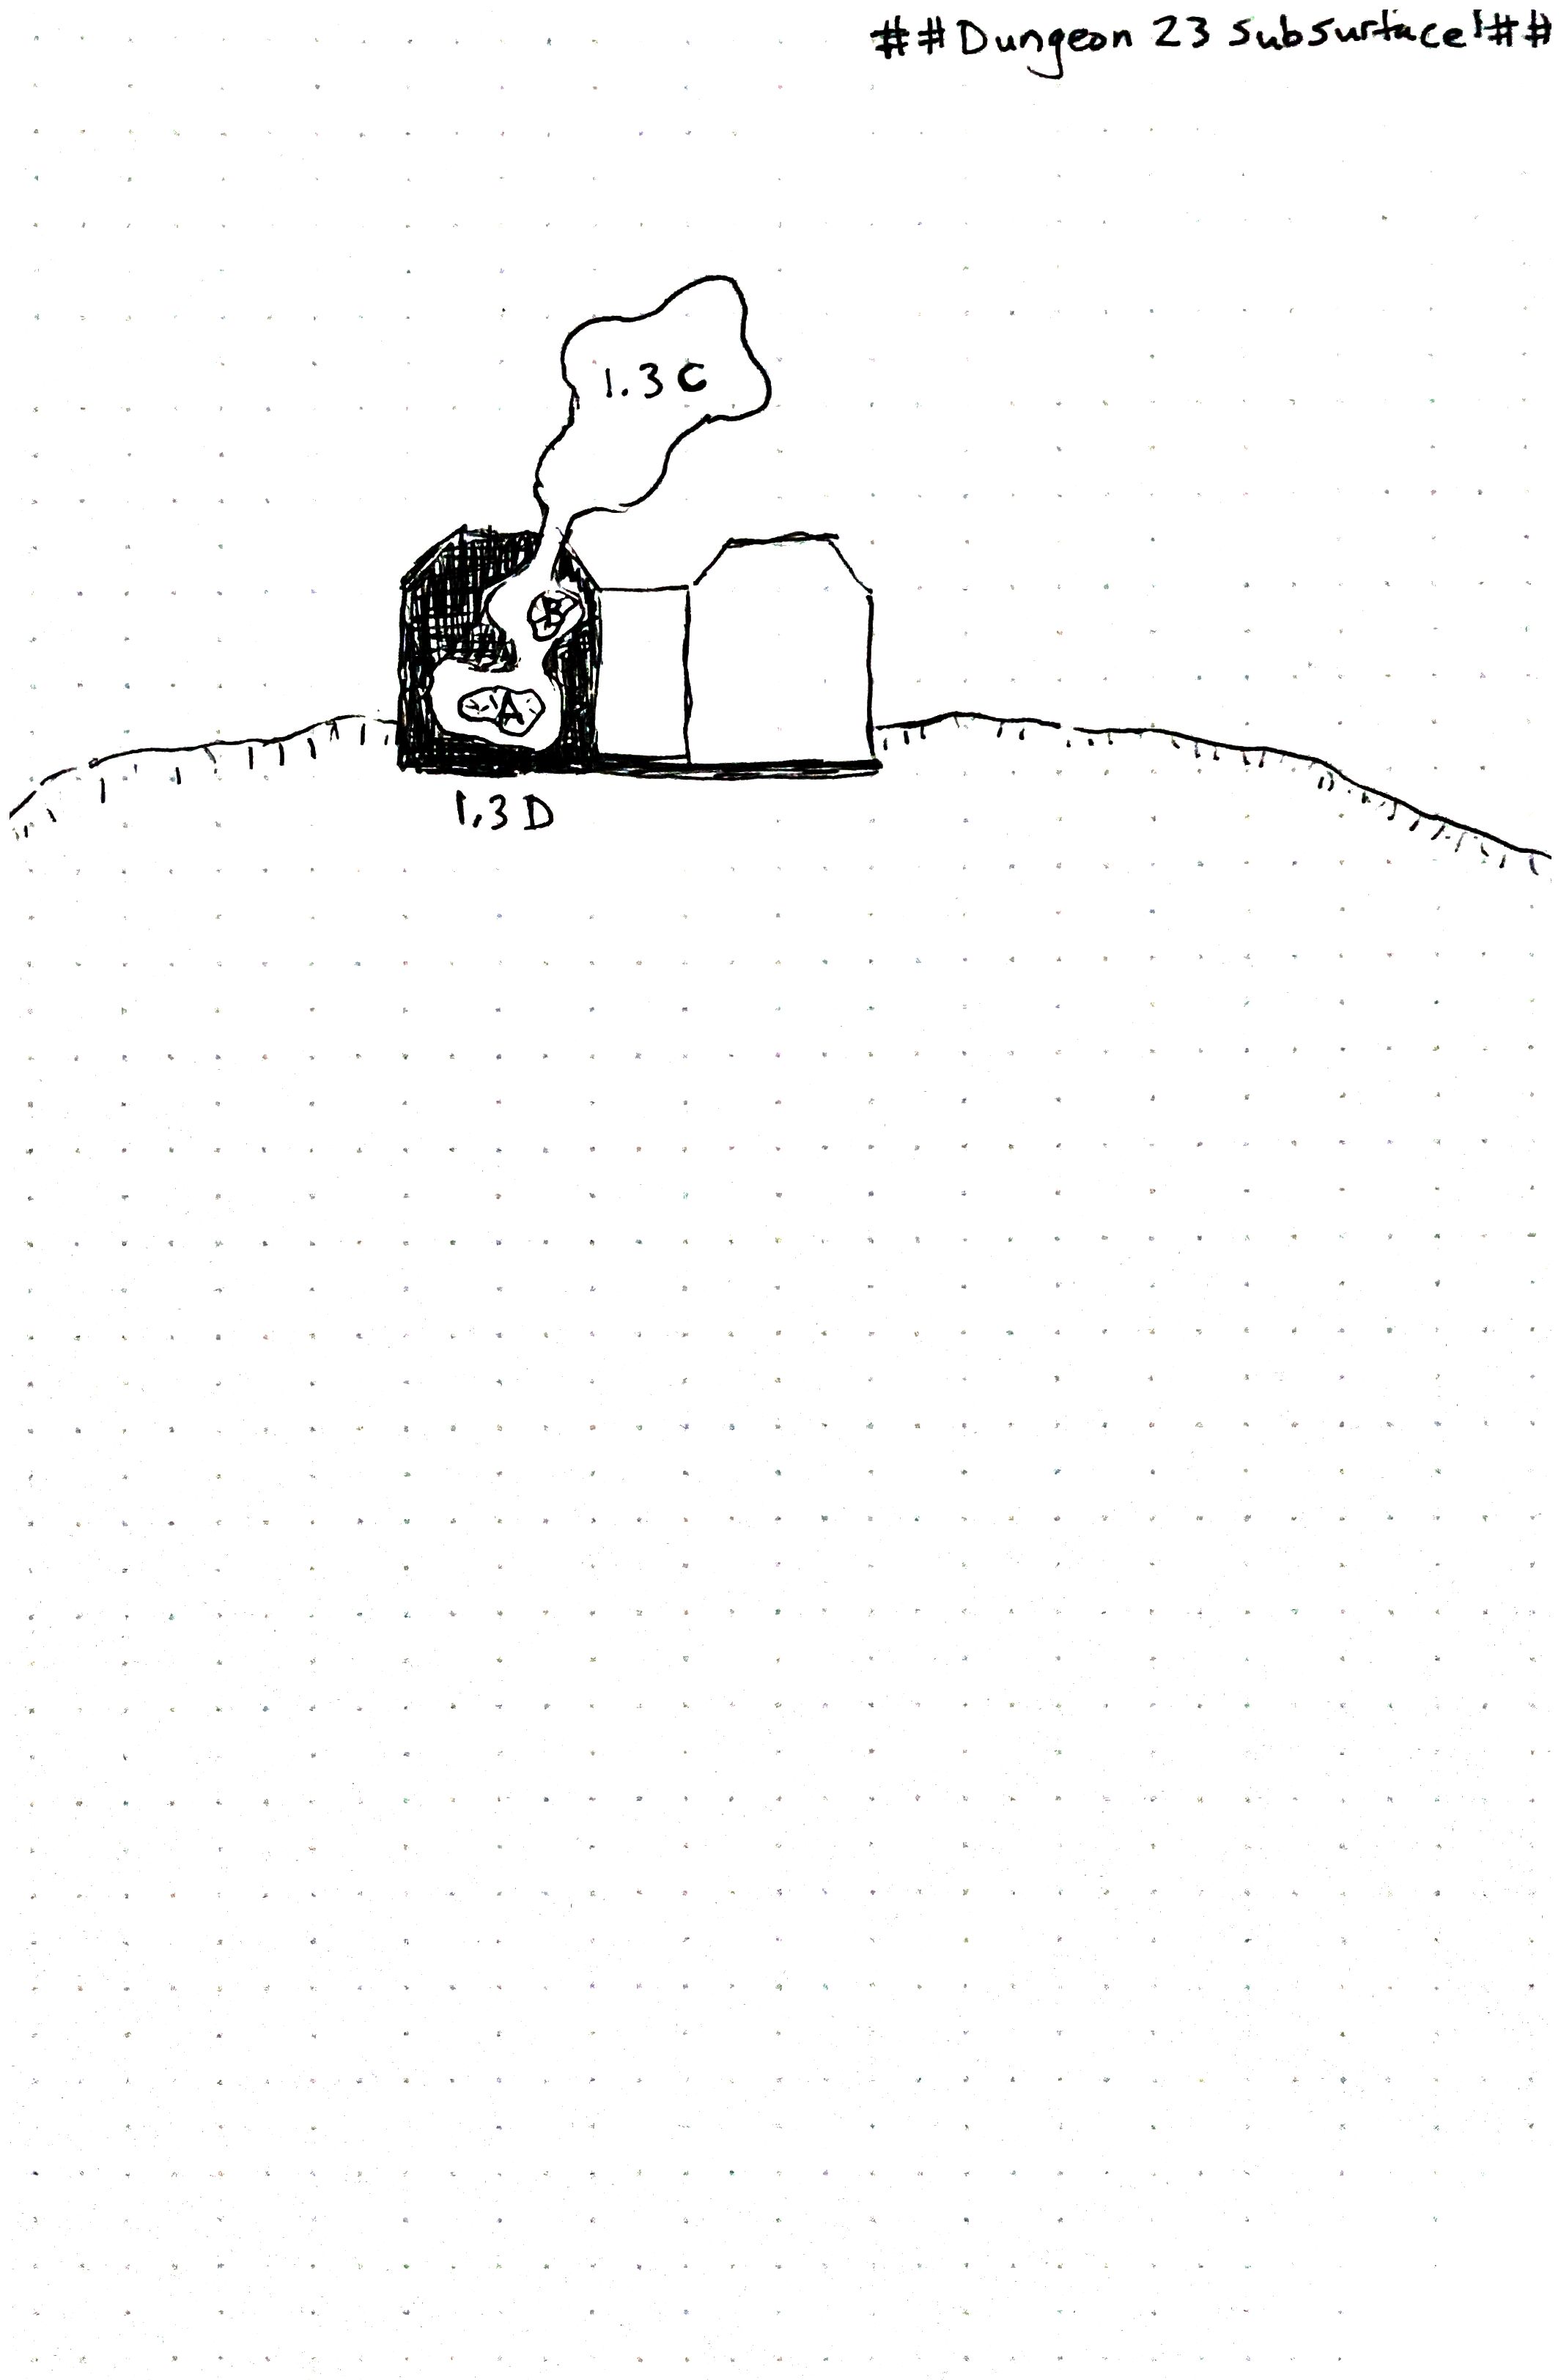
The locations marked A and B in this room are holes leading further below, opening onto the sublevel areas 2.XX. The holes appear to be ringed with snarls of thorny roots. These are two Stone Creepers (2x CR 1 medium plants from the Tome of Beasts 2).
In addition to the two Stone Creepers, a total of 7 Swarms of Bats nest here. (7x CR 1/4, Monster Manual) During daylight hours, assume 1 swarm adjacent to each of Creepers A and B, and the remaining 5 Swarms in the larger cave marked 1.3C. At sunset, the bats alight and fly out of the tower. They return 1 Swarm at a time over the hours before dawn.
Lastly, the dark cave here is also appealing to snakes, of which there are many in the vicinity of the castle. At any given time there are 1d4-2 Poisonous Snakes (CR 1/8, Monster Manual) here, either hunting bats, or curled up in the roots of a Stone Creeper.
A Potential Disaster: Nothing that lives in this hole will seek to cause trouble for
the PCs, but incautious PCs who plunge into the depths, make shocking loud noises,
or unleash open flames will create a chaotic and perilous situation.
Stone Creepers are not generally aggressive to other organic life, but they will get panicked if the PCs try to uproot them, or if Medium size or larger PCs try to push through or past them to get to the area on floor 2, below, and will use their acid-exuding thorns to defend themselves in such circumstances. If the PCs bring open flame down in to this area, the Stone Creeper's panicked reaction will be even worse.
The wall marked 1.3D has been weakened over the years, and the creature will rip its way through to escape. This will cause the entire west tower of the north barbican gatehouse to collapse. Damage to any PCs in or within 10 feet of the tower (and any Sword Wraiths in 1.2, above) is as described for the Stone Creeper's Weaken Stone ability. If the Bat Swarms and/or Poisonous Snakes survive they will become agitated and violent.
In the wake of the collapse,
a large pit will be left open directly into area 2.XX. This collapse
will obviously raise a great commotion, and the sudden unexplained transformation of the tower will put all the denizens of the ruins on edge. If this happens, raise all Alert Levels by 1.
(I'm jumping the gun a little, getting ahead on this because I don't anticipate having time tomorrow night. Don't want to fail the challenge on day 2.)
Room 1.2: The upper floor of the gatehouse. The eastern section has a Scorpion (treat as a Ballista, per the DMG) that can be pivoted to aim out any of three firing ports. Additional slightly smaller arrow slits allow for crossbow shots along other avenues of approach.
The western section has a collapsed floor leading into area 1.1A, and the Scorpion that should be on this end is missing.
Between the two sides is a middle section overlooking the bridge. It has two raised portcullises in this upper space, and the floor section between them has numerous murder slits for raining bolts downward. Note that the gears and winches for the portcullises also collapsed when the floor in the western section gave way. The grates are held in place by locks and wedges. If they were to be released, they would slam downward into place, and given the broken and missing winch system, there's no easy way to lift them back up. (Lifting the now-jammed gates by hand in the middle of a battle is a Difficulty 25 Athletics check. Doing so with a group of people outside of combat is automatic, but takes several minutes of focused labor.)


This room is guarded by two Sword Wraith Warriors.
(2x CR 3, per Mordenkainen's Tome of Foes)
In life, these warriors were tasked with guarding the bridge, but when the castle was defeated by treachery and sorcery instead of by force of arms, they were trapped within the barbican and starved to death. They now wait eternally for the attack they were sworn to repel.
If any of the PCs (or their allies) come from a distinguished family line with a famous coat of arms or long history, it's possible that these warriors will recognize their heraldry and seek to block their passage on the bridge. The same holds true if a PC returns to the surface with the magic shield emblazoned with the three black crowns on a red field (see room X.XX, below). In such a case, the portcullises come crashing down forever and the Sword Wraiths will sally out for combat, or fire bows or scorpion as necessary.
Note as well that the Sword Wraith's special Martial Fury ability has great synergy with fighting on the staircase from 1.1B: they get the extra attack, and the Advantage it would give the PCs is canceled by the Disadvantage of fighting up the stairs. That would be part of these Warrior's trained tactics from their mortal posting to this tower, so it's definitely a tactic they would attempt to utilize from beyond the grave.
Treasure: Scorpion (if you can disassemble it), 20 large bolts for the same, 14 electrum pieces dating to the era the castle was built in, and the weapons and armor on the Sword Wraiths.
(The missing scorpion and winches from the western section can be found in room 1.3, below.)
 Here's today's initial sliver of my map (...and part of my thumb, because of how I was holding the RocketBook). It's actually sort of two rooms, and a bit of a bridge, but none of these have monsters or anything, so I'm just counting it as my one room for the day. The idea I'm working from is that my dungeon is a castle ruin. So this part is a gatehouse or barbican at the far end of a bridge or causeway leading in to the castle. There will probably be a few other above-ground features, so my first official Dungeon Level may actually be split between two floors.
Just on a lark tonight, I decided to open up one of my old incomplete How To Host A Dungeon maps and run a couple turns on it. So this is 2nd Edition HTHAD, and the map I grabbed is this Magician's Map where I did the Primordial Age and the Magician's Civilization, but nothing further. It's currently September of 2021, and here's two more turns on an old map that I hadn't touched since May of 2020.
 |
| Age of Monsters, start of Turn 1. Click on the picture to zoom in. |
I was pleasantly surprised how easy it was to pick it back up after such a long gap. That's probably a function of stopping where I did: right after the resolution of the relatively complicated end of the Civilization stage, with a map that was mostly empty.
At the start of the Age of Monsters you pick three random Monster Groups.
I must confess, I fudged things just a little to get Miners in the first turn. I used a minor house-rule when picking my third starting group. I'll post about it tomorrow.
Age of Monsters, Turn 1:
Fast and simple:
Per the rules, no new Monster Groups until Turn 2.
 |
| Age of Monsters, end of Turn 2. Click on the picture to zoom in. |
Age of Monsters, Turn 2:
You randomly reorder the Monster Group's activations each turn, so we'll start with the Miners this Turn.
The new buildings are kind of hard to see on the map at the moment because monster tokens are covering them, but when I get to the end of the game in a future post, I'll uncover them, and I think they'll make for some interesting map details. I'm pretty happy with the direction the map is developing in. The statue of the fork goddess is huge, a bit larger than any of the miner's constructions.
At the end of Turn 2, I draw a new Monster Group, and I get: The Temple. Instead of adding a new group to the map, it upgrades an existing random group, so that's a 50/50 flip. I roll the goblins, which is perfectly appropriate given that the Shiny they built was already a statue of the fork goddess. Clearly a strong component of the new goblin religion is community feasts. This gives them another population, another treasure, a prepare "star", and the "Order" keyword. The goblins are basically about a turn away from triggering the Age of Villainy already. This might prove to be a really short game... then again, I've had one game of HTHAD2E where the Villainy phase alone ran about a dozen turns, so there's still some chance I'll be surprised and have a lot more happening on the map.
It's late, so that's it for tonight. It was nice to get back on the dungeon-horse. I expect I'll play out some Turns of this map in the near future.
This is another How To Host A Dungeon map that I recently stumbled upon on my computer. (Click here for Index of How To Host A Dungeon articles.)
This one was using the "Muck Dwellers" Civilization, which someone had posted to the How To Host A Dungeon Wiki. I remember being super-excited to try that out.
Despite that excitement, this map/game definitely wasn't finished. Looks like I wandered away from it twice: once for 6 months during the first turn of the Age of Monsters, and then again more permanently after trying to pick the game back up for a few turns. Not sure why I abandoned it, exactly, but it does date to 2015. There was a lot of crazy stuff going on in my life around that time, and quite a few projects got abandoned in the upheaval. (I suppose it's also possible I was just mostly excited about the Muck Dwellers, and lost focus once their part was done... but I suspect this was a casualty of a particularly hard year.) It's a shame I never finished it, because I really liked the "bubble" design I used for the Muck Dwellers constructions in the 2nd and 3rd images (below).
I still have a note file from the game, so I'll post the text from that here with pictures:
Primordial Age
Started with Isle of Death map template. It’s gonna be harsh on the Surface Kingdoms.
Underground River
Mithral deposits
Caves - Gems, Primordial Beasts, Empty with tunnel, Fate
Caves - Gems (2 in 1 cave), Primordial Beasts (3 different caves), Empty, Magma
Planning to use a homebrewed civilization - probably Muck Dwellers. Can put them anywhere on the river, or just at the bottom of either sea section. The latter is very tempting since it’s not normally an option at all.
Age of the Muck Dwellers - Year 1
After founding the great city of Kli’itl-Tilp’diilb’p, the Kuo-Toa mine gems, expand their city to house the new tadpoles, and then decide to send an expedition way down river in search of additional mineral wealth. Traces of Mithral in the rocks along the river shore encourage them to create a new colony with it’s own tadpole pool.
Age of the Muck Dwellers - Year 2
The mining colony of Dwib’ilb’p is coming along swimmingly.
Age of the Muck Dwellers - Year 3
Kli’itl-Tilp’diilb’p builds the Tomb of the First Smolt, to house the named treasure “The Silvery Shoal of Squish’blip’itl.
Dwib’ilb’p expands and mines further.
Bloop’itl, the spa and breeding colony is founded half-way between the city and the first colony. A breeding pond is built over an active geothermal hotspot.
Age of the Muck Dwellers - Year 4
Chambers of Secrets built. I may have forgotten to mine this year.
Age of the Muck Dwellers - Year 5
Kli’itl-Tilp’diilb’p has the population to split, but there’s no water-routes to anywhere it could expand. Luckily, Dwib’ilb’p still has unmined minerals, and that keeps Kli’itl-Tilp’diilb’p from growing stagnant.
Dwib’ilb’p expands and mines further (including making up for forgetting to adjust the mines last year). They dig a new habitat room, and it floods a natural cave.
Bloop’itl builds an exploratory shaft, and a Temple to Mother Hydra. The treasure within the Temple is the Jellyfish Cauldron.
Age of the Muck Dwellers - Year 6
Dwib’ilb’p’s expansion unleashes a horrible Dinosaur in an old cavern. Despite these losses, the civilization continues to grow.
Kli’itl-Tilp’diilb’p builds a temple to Father Dagon. The treasure there is the Stingray Sceptre.
Bloop’itl tries to expand upon the greatness of Temple to Mother Hydra, and they break through to the surface! The great burning orb in the sky is a dire omen, so they abandon their city and its colonies in search of safer depths.
Great Disaster All we get is new caves (my roll transferred me to the Primordial Events chart). Yet another Primordial Beast (but this one’s a Sea Monster), and a very dangerous Plague 4 cave right near the surface! There’s also some water caves that caused flooding, and a tunnel cave that goes right over (and thus fills with) magma. With this and the Kuo-Toa orphans (tadpoles left behind in the escape) we have a total of 7 wandering monsters on the map before we even get to the Age of Monsters.
Age of Monsters: Set-Up Auglire Keep is Built
Lithonids (Delvers, Lawful, 50% to create treasure when they die.) 5x11 = Chambers of Secrets
Crabmen (Breeders, Chaotic, No Special Rules) 3x5 = flooded tunnel-cave in lower left
Giant Octopus (Alpha, Hungry, Aquatic) 10x3 = Just above the wandering Sea Monster. It will eat it, and then start raiding the castle pretty soon.
NOTE: At this point (half way into year 1 of the Age of Monsters), I took over 6 months (of real-life time) off from the game, and a lot of crazy stuff went on in my life to thoroughly distract me. So I’ve probably forgotten a few details of what transpired and how it all works. We’ll test whether or not my notes are enough to finish this map/game.
Placing the Lithonids (delvers created by a contributor to the HTHAD wiki), I decide (since the wiki description vaguely implies they are rock monsters with gem-covered hides) that I will use the rainbow “Gems” treasure tokens I’d created back on the Primordial Age to be the Lithonids’ treasures (including the ones they sometimes turn into when they die). That lead me to rainbow population tokens, and a translucent rainbow underlay to mark their areas of the map.
Crabmen dig grottos in one of the old deep water fissures, expanding it out into a very organic shape.
Giant Octopus is named Eight-Death by the locals of Auglire. In his own tongue, he is named Chlughpligth.
AoM Year 2:
The new arrival is wandering Ankhengs, and I give them fairly long wormy tunnel lairs, following the path of structures from deeper strata. There are a LOT of wandering monsters on the map right now, but I imagine they’ll clear each other out fairly soon.
Humans build a little terrace farm.
Primordial Beasts (and Sea Monster) do nothing, because I roll a “3” four times in a row.
Kuo-Toan Orphans wander a bit. Some engage in Mutual Assured Destruction with an Ankheng. Others merely explore the breeding ponds of their ancestors.
Lithonids engage in tunneling. They don’t quite have the range to get to any treasure this turn, so they convert an old cave system into a staging area for next year’s mining efforts after either gems or mithral. In retrospect, they probably could have reached the Tomb of the First Smolt this turn instead, but I didn’t think to do so until after I’d drawn in and colorized their new area.
Crabmen numbers bolster, and they spread out. Since there’s only one path available to them, they dig a little. Eventually they run into Primordial Beasts, and the number of Crabmen drops back down to sustainable levels.
Eight-Death strangles and devours the nameless primordial sea monster.
Surviving Ankhengs stay in their lairs.
AoM Year 3:
New Arrivals = Party of 2 Adventurers
One Primordial Beast wants to wander, but can’t because there are no exits from his cave. Had the other one wandered it would have opened up old tunnels and probably died to plague.
Kuo-Toans sit tight. Perhaps they really liked the breeding pool. While they don’t have a Zone of Control, it’s still work drawing back in some of the areas near where they’ve wandered.
Surface Kingdoms continue to build their numbers in the castle, and establish a small fishing village (mechanically identical to a farm) in the bay below Fort Auglire. They have enough population, but not yet enough infrastructure, to launch an expedition.
The Lithonids extend a tunnel to the primordial gem deposit, which is sacred to their kind.
Crabmen numbers expand uneventfully.
Eight-Death sends an exploratory tentacle into the fishing village, and comes back with a tasty morsel.
Ankheng in the old Temple of Mother Hydra becomes agitated and digs to the surface. It raids Fort Auglire itself, and is put down after causing much carnage.
Two human adventurers arrive on the island to brave the tunnel from which the Ankheng had emerged. They wander about in the twisting tunnels of the beast’s lair and the ruins of the old Temple of Mother Hydra for some time. They find the Jellyfish Cauldron of the ancient temple and haul it out a seaside cave, only to be set upon by Eight-Death. Both adventurers die, and all the treasure sinks to the bottom of the bay. (When you end up with really convoluted tunnels, the random navigation of adventurers and monster groups can get a little tricky. Adding the water/island situation to the map made that even more complex, but I’m pleased with the result.)
T1 = The Silvery Shoal of Squish’blip’itl (Kuo-Toa)
T2 = Jellyfish Cauldron (Kuo-Toa)
T3 = Stingray Sceptre
And that's all I wrote. After that, I wandered like a monster off the edge of the map. I've still got the master map file so it's a little tempting to take a third stab at it.
I was thinking of playing around with How To Host A Dungeon this evening, and thought I'd put together an index of my HTHAD posts. (Click here for Index of How To Host A Dungeon articles.) In gathering those articles up, I realized, I've actually posted to this blog less than half of my HTHAD maps over the years.
So let's unearth one. This is, I believe, the first one I ever did on the computer. I have a few older paper maps floating around my gaming room somewhere, but this is the first digital one. It was sort of a proof-of-concept to see if it was worth trying to do them digitally. It was. And as it turns out, I took notes while I played, so I can paste those in here to go with the maps. The notes will be rough, as they date back to roughly 2014. It's from the 1st Edition of How To Host A Dungeon.
Light-colored circles with a large "T" on them are treasures. Darker circles with other letters on them are the population tokens of various races, such as "D" for Dwarf. The numbers on the edges of the first map were used as coordinates for placing things randomly.
Primordial Age:
Sorquoorm the Ancient Wyrm, w/ Treasure: “The Root of the World” - P2, steals Treasure.
Earthquake
Imps (Itinerant Wizard Wandering Monsters) w/ Treasures - The Trilogy of Immortality
Dwarven Age:
Year 1:
Year 2: Workshops built. One imp moves north.
Year 3: Great Hall with Dormsturl, the Gong of Endless Charisma
Year 4: Exploratory Shaft
Year 5: Expansions to the Great Hall
Year 6: Hall of Records with Dromrune, The Codex of Magma Aura
Year 7: Founding of the City of Himboldihr, most of population moves into it. Create an amazing drilling tool, Nagundond. Imps move a bunch, and two of them join together
Year 8: Treasure Chamber. Nisbrund The Device of Transform Gold. Visgund Gear of Control Gold.

Age of Monsters:
Set-Up:
Brancheley Keep Humans
Yarplikk Molenn - Derro (Delvers, Law)
Grobgash - Cave Giants (Breeders, Chaos, x2 Strength)
Cadro Bazius the Devourer - Dragon (Alpha, Chaos, +2 Strength, Doesn’t spend Treasure)
Year 1:
Dimensional Gate opens in Himboldihr. 2 Djinn arrive. One carries Doomed Box. Other carries Dreamer’s Lamp.
Sorquoorm eats an Imp and steals one third of the Trilogy of Immortality.
Other imps stay put.
Grobgash loot the Gong.
Yarplikk Molenn expanded down the hall.
Cadro Bazius attacks the Giants, and they bribe him off with normal treasure.
Year 2:
Mimick appears in the Treasure Vault.
Sorquoom eats an Imp, but can’t take its treasure because the other imp survives.
Imp tries to run and hide, but chooses a poor direction.
Yarplikk expand to surface. Build a tower and a wall.
Grobgash Giants bribe Cadro with the Gong. This is bad for them because it's Cadro Bazius attacks the Yarplikk Molenn, and they drive him off. He moves his lair down to the huge old dwarven mine level. He leaves behind the mundane treasures the cave giants had given him, but take the gong, his talisman, and his own cash.
Djinn and Mimick stay put.
Year 3:
Adalod’s Mining Company (Human Miners)
Sarquoom eats the last Imp. Steals a chapter of the Trilogy of Immortality. Reveals that the imps had been protecting the Statue of the All-Seeing Eye.
Yarplikk expands out and captures a farm.
Giants kills a mimic, don’t lose any. Population stays stable.
Cadro Bazius eats a Djinn.
Other Djinn chases the Dragon, and dies. It’s like a food and treasure delivery service.
Adalod’s company starts exploring a mine
Year 4:
Wandering Monsters - Duldrok, Kroddrock, and Shuzdrok. Sorquoom drives them out of his lair, and then dies from the wounds they inflicted.
Brancheley Keep builds a farm.
Yarplikk expands into Cave Giants, loses the war, loses their last treasure, and abandons the colony.
Grobgash siezes mimick treasure. They give that treasure to Cadro Bazius, so it is bribed and doesn’t attack them.

Age of Villainy:
Cadro Bazius becomes the Villain. He expands his lair a bit, builds a temple of chaos, and a hoard, and four defensive works.
Villainy Year 1:
Cadro Bazius digs into old Dwarven Vault, kills mimick, claims all three treasures (including Nisbrund and Visgund). Goes foraging, and finds Dromrune.
Surface Humans reclaim the Farm the Derro had taken before.
Grobgash expands, outgrows its resources, and splits. The new clan is Grobghug, which expands into a cave on the far side of Cadro’s territory. Then Grobgash tries to bribe Cadro Bazius again, and fail. They fight him, and the dragon devours them.
Trolls stay put.
Grobghug expands a short distance from their starting cave.
Adventuring Party of 6 enters via the unexplored earthquake shaft. They side-step the mimick. They slaughter Grobghug. They discover Secret Stairs to the old Dwarven Vault. That’s how the Giants of Grobghug made the journey around the Dragon’s lair.
Adventuring Party heads to the trolls. Kills them around their Cauldron of Bones.
Adventuring Party encounters Adalod’s Mining Company, who hires them to kill the mimick. They do so, and are rewarded with the first chapter of the Trilogy of Immortality.
Adventuring Party finds the rest of Sarquoom’s treasures in the Halls of Decay. Then they attack Cadro Bazius, breaking in via the Temple of Chaos gate. He kills all but one of them, who escapes with most of the treasure, including all three parts of the Trilogy of Immortality. So he’s still alive somewhere.
Cadro Bazius finds the Root of the World among the bodies of the Adventurers.

Ready for Year 2 of the Age of Villainy.
Treasures:
T1: The Root of the World (Sorquoorm)
T2-4: Trilogy of Immortality (Imps)
T5: Dormsturl, the Gong of Endless Charisma
T6: Dromrune, the Codex of Magma Aura
T7: Nagundond, the Eternal Tool of Gold Gush
T8: Nisbrund, the Device of Transform Gold
T9: Visgund, the Gear of Control Gold
T10: The Thinker’s Talisman
T11: The Dreamer’s Lamp
T12: The Doomed Box
That's where my notes end, and it's the last picture I saved. So it kind of looks like I never finished the map. It's also possible that the first roll of the 2nd Turn of the Age of Villain brought it all to an end and I just wrapped up without making a note of the result. The game does tend to end suddenly.
Looking back on this map, one thing I will comment on is the blue areas. They're not flooded or anything, I think I was just marking civilizations or territory controlled by the initial Dwarven civilization, or the later Derro monster group. I then reverted them to the tan/orange color for empty passageways that were no longer under the control of those groups... though I'm not sure whey the secret stairs were in blue, since the Dwarves should have been long-dead at that point, or why the Derro areas are still blue-ish when they don't have any population tokens left on the map. I was probably just being sloppy because I had no idea that future me would blog this stuff 7 years later.
The following is the campaign log for the fourth session of my current Amber Diceless RPG campaign. Most of this log was typed up by one my players (thanks, Brendan!) during the session. I've added a few notes of my own.
You can Start from Session #1 or just Rewind to Session #3.
Campaign log: 12 October
Setting the Scene: The first few sessions were a failed assassination attempt and a murder investigation set against the backdrop of a banquet in Amber with visitors from Chaos. Tangential investigations continues in this session more than anything else.
The PCs are:
Most of
the NPCs are from the novels. Not just the big-name Amber Royals, but
also plenty of minor characters, such as Will and Dik, who only show up in a
paragraph or three of a single novel each. I was particularly happy with the way I utilized Roger and Rolf, two castle guards from the novels. Another non-Royal is completely my own invention: Jinna the Scullion, who dispensed exposition and minor clues in several later sessions as well.
A few major Chaosites show up in this session: Nykae is the mother of one of the PC, and serves as General in the armies of her brother Sevran. Other minor Chaosites such as Brute and Steward are present as well, these are all connected to Abn Haram's character sheet in one way or another. Allies, minions, conjuration results, etc.
Scene 1: Abn Haram heads to the stable with Steward - Abn Haram, Steward, Brute in the stables of Castle Amber
Abn Haram stuck Kimchee in his eye. (He was trying to figure out if chemical weapons work in Amber.) Steward shows up with a painting, front/back, and some Amber chess pieces.

Steward says she was on an errand for Abn Haram's mother, Nykae. They head for the stables.
Abn Haram wanders the castle some more, and Maarit (who was in the opposite end of the stables, see scene 3 below) decides to stay on his trail.
Abn Haram tries to use the Tarot to find his mother (the card grows cold but he cannot establish a connection). Haram asks a guard if he can have someone contact King Random, but no one is willing to do so. Haram goes to the library and marvels at the old timey technology. He browses the organizational materials, histories, scientific treatises, etc. Haram makes an excuse to head for the toilet when he senses contact through a Tarot.
It's his Uncle Sevran; they chat about the state of things. Sevran suggests Nykae might be injured, suggests it's suspicious that Haram hasn't seen her. Sevran tells Haram that Nykae was trying to get "some objects," directed toward an effort to reach Haram's father. Haram passes the chess set and painting through to Sevran. Sevran decides to bring Haram into his confidence in his mother's absence. Nykae and Sevran have been watching a hole in reality, which has been growing. Recently the hole ruptured and a "horse with a horn" came out of the hole, killed people, and escaped. Sevran's trackers went after it, but they haven't returned.
Sevran says he will assemble a group of people to try and force a call to Nykae. Haram gives Sevran's card to Steward to use to give Sevran regular updates. Maarit and Haram chat about Haram's pretend diarrhea that he used as an excuse to avoid being observed on his call.
Haram studied the painting before he passed it to Sevran - the painting is very old, has cracks where it was folded. No tarot quality to it, but the paints are very high quality. It has the potential to have some under painting.
GM's Note: I have had very little luck in anticipating the motivations and actions of Abn Haram. His player always surprises me, which is really cool, but does sometime result in wasted efforts on my part. This map-like-thing (above) was clearly a secret the character's mother was interested in, with an implication that it was the whole point of her traveling to Amber. It was also implied to be related to the disappearance of his father (Osric). We're six months and a dozen sessions since that prop's introduction, and this thread has gone more or less nowhere. That's okay, the campaign has a lot of subplots, so there's plenty happening. It _may_ mean that this could prop back up later in the campaign if the plot ever slows down a bit. Which will probably feel like a cool call-back when and if that happens. Until and unless it does, though, I can't help but feel like it's a failure on my part. A bit of a fizzle in an otherwise excellent campaign.
GM's Meta-Note: Rolf, Roger, and Will are actual minor characters from the Amber novels. All three are guards in Amber's dungeons. Of the three, only Roger gets any memorable lines or development in the books: he's basically an author-insert character. The books are written by Roger Zelazny, and Roger the guard is writing a novel at his guard post. My real-life name happens to be Rolfe, so I decided to give Rolf a tiny bit of development and screen time as well, as a tip of the hat. In one of these early sessions (probably this one) there was a fair bit of meta-/sub-text to the banter as Rolf and Roger talked about how they split the responsibilities of keeping the Pattern safe.
GM's Edit: The thing that caused Bleys to break off was Dalz thanking him for including him in things and not treating him like a child. Bleys said "let's not get all sappy about it" or something to that effect as he broke off the contact.
Scene 3: Maarit heads for the stables - Maarit, Mathis, Bronze
She looks for some guards on her way, adding the stables to their rosters. Then she finds a spot to sit in the stables where she can listen for Abn Haram to guard him, subtly. Steward sees Maarit and alerts Abn Haram to the surveillance. Haram goes back to sleep.
Maarit admires Bronze, a strangely-patterned horse (it's striped brown and green), and chats with a stablehand about it -- who reveals that these are "wonder horses." She and the stablehand open the idea that she might come back and ride the horse. Bronze belonged to Sand, whom Maarit has never met, but has been told is her mother. Bronze has been maintained in these stables for a very long time.
Scene 4: Medore questions Dik - Medore, Nix (Spinturnix), Dik in Castle Amber
Upon realizing Medore is trying to get Dik alone, Nix stays in the library while Medore walks toward Dik's quarters. Medore questions Dik about the messages written under the plates. Dik confesses that he smuggled a gift on behalf of Lady Karm to Abn Haram, some sort of light love token. Medore promises to protect Dik in exchange for his help finding out which Kitchen staff might have planted the message. Dik suggests Ginna the Scullion seems suspicious, as does the chef.
Dik mentions the message he had to give - "The door is open far below...Lady Karm remembers the debt owed to Gehenna's finest son... Many happy returns" - it was accompanied by a key. Dik hands out a folded-over handkerchief with a gravy-stain image of the key stuck on it. Medore assures Dik that he's protected.
4b: Medore meets up with Corwin - Medore, Corwin,
Medore asks Corwin about Lady Karm, that she's trying to reach out to the Chaosites.. Medore suggests that it was a servant who wrote the message, and Corwin agrees, but suggests it was done at the behest of a family member. Medore says it could have been "Jinna the Scullion" or "Chef Wilhelm." Corwin invites Medore to join him in the morning at the place where Corwin likes to go to remember Medore's mother.
Corwin asks more about Karm's message, Medore repeats the message to Corwin. They proceed to the ambassadorial suite, then stab some bodies and rifle through their clothes. The bodies start smoking after he stabs them; Corwin puts the smoking body in the bath tub and takes its clothes. They search the bodies to see if they're carrying any shared item. They each have a piece of iron jewelry, which Corwin finds significant. Corwin suggests he'd want the King to arrest the Chaos delegation. Corwin establishes that the murdered Chaosites smoke or burn when he stabs their corpses with Greyswandir; the assassins do NOT smoke.
Medore and Corwin discuss the next steps -- who they can trust, which door they think the key opens. Medore gives the gravy napkin to Corwin, then heads for the kitchen. He gossips with the kitchen staff and learns that the Chef yelled at everyone that night, was fussy for his table settings. Medore has a tasty dessert and reports to Corwin before he goes to bed.
Scene 5: David leaves Caine's ship - David, Caine and (Caine's nephew from Rebma?) aboard the Venom
As David leaves Caine's ship, he sees an eddy of water and a submarine from Rebma surfaces. The person on the ship calls out that his uncle is expecting him, and Caine's crew invites the unknown person aboard. David, having seen this, rows ashore and heads for his camp to go to bed. He arranges for an early call.
5b. David makes breakfast - David in City of Amber then Castle Amber
David rises early, takes a run to the early markets, and then begins cooking breakfast for King Random. He learns that Chef Wilhelm has taken the morning off, so David makes the relatively simple dish: pancetta something something something (not at all simple). David has to rush and ends up giving the King a plate of total garbage.
(David's Edit: In fact, I simply stopped curing the pancetta a few minutes early, so it may be only somewhat less salty than optimal. And the meal is pancetta, oysters, and crayfish in a soft scramble with Egg-Avocado toast, which I assure you is quite simple, in the grand scheme of culinary things: a protein scramble with toast, more or less. One must be mindful of what one puts in one's body, yes?)
GM's Edit: That is one of the great things about running your game online, and having logs and pages the players can access. Players can jump in and later clarify bits that others didn't catch the first time. I'm lucky to have such active participants.
“I can still deny everything. I don’t know anything about it.” -Abn Haram
I rub a bit of Kimchee in my eye. Does it hurt? I am a man of science after all! - Peter/Abn Haram
"I'm giving him space, but also making sure that he doesn't get got." -Marit
“I’ll protect your secret, but in exchange, you will help me figure out who on the kitchen staff had motive to leave those messages.” -Medore
“My friends do very well… I protect my friends.” -Medore
“That does make sense… he is always trying to get in mah pants too.” -Kitchen Maid
“Yes, turns out Dick is the center of the universe.” -Rolfe
“I am in a bit of a hurry, I had a lot of that Kimchee.” -Abn Haram, hoping to not be followed into the bathroom
I supposed we should serve less Kimchee next time. -Marit
“I haven’t had a party this interesting in at least six months.” -Medore
"Family is far more plural than it used to be." -- Corwin, to Dalziel
The following is a snapshot of the Roll20 landing page for my current irregular D&D game.

We'll be playing a bunch in the next few days, and then probably not again for months. This tends to be a holiday game, as that's the only time all the players have days off in common.


(Addendum: It occured to me a few weeks later that they probably set it up that way intending for you to launch the module as a new campaign each time you want to play, so having multiple pages per campaign wasn't even a thing they considered. I think I prefer to have all the maps from every game of The Quiet Year that I've ever done online all be accessible in the same campaign framework, for ease of reference, and so I can show off old maps when teaching the game to new players. I suppose that preference might change if I do ever get around to starting an RPG campaign with a round of The Quiet Year to make the map for the campaign. You might not want a dozen other maps clogging up your campaign in that situation.)All told, it was less than half an hour of work to set up a reusable online version of the game, but if I had just bought it and thought I could start play right away I would have been surprised that I needed to take those extra steps the first time. I don't really know the first thing about how hard it is to build a sellable product on the Roll20 Marketplace, but it seems like it wouldn't be too much to ask for the game to come with a few assets that were selectable from the art library of the marketplace item, such as a set of tiny dice icons (or better yet, a prebuilt rollable token), a themed graphic for Contempt, and the yellow parchment background that you could then drag and drop to start a new page (bonus points if you could use it in other games/campaigns). I wonder if that's possible?

 Age of Villainy - Turn 1: Antlings Horde, The Experts, Giant Pike, Dwarves, Kobolds, Orkz +Gnolls
 Age of Villainy - Turn 2: Antling Horde, Gnolls, Experts, Giant Pike, +Medusa
 Age of Villainy: Turn 3 - Antling Horde, Experts, Gnolls, Medusa, Dwarves, Giant Pike,
 Age of Villainy Turn 4: Antlings, Giant Pike, Gnolls, Medusa, Troglodytes, +Starhelm ++Demonic Hordes
 Age of Villainy: Turn 5: Antlings, Giant Pike, Demonic Horde, Troglodytes, Starhelm
